
Yamaha Pianica 32A
Tagged: bath, cleaning, Yamaha 32A
- This topic has 30 replies, 5 voices, and was last updated 5 years, 8 months ago by
 Alan Brinton.
-
AuthorPosts
-
August 22, 2017 at 3:20 am #9177
Tyely
ParticipantI have one sir.
I have Yamaha Vintage 32A Pianica..July 19, 2018 at 6:03 pm #10062 André Sant’AnnaParticipant
I just bought a Yamaha 32A. It is really differentiated, but my copy is not in such good condition. It needs a deep cleaning and it has a small leak. I tried to open it, but I noticed that internally it is very different from the P-32D. For example, I could not access the reeds. Any tips on how to do this on Yamaha Pianica 32A? Another thing, I read the forum material on how to perform a cleaning by means of a “bath” but I do not know if this procedure is indicated to this model of melodica. What do you think?
July 19, 2018 at 7:50 pm #10063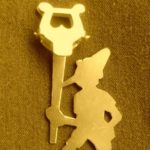 Alan BrintonParticipant
It should look like this inside, Andre. To the best of my memory, the reeds are accessed by removing the four screws and removing the blue reed chamber cover. Some related models have spring clips that have to be removed. This model can be given a bath, a good soaking in a water/alcohol mix (3 to 1 or 2 to 1). Shake it around, work the keys, etc. The key action is probably sticky, and that will be improved (though it’s usually still a bit of an issue with these models). 70% Isopropyl alcohol from the pharmacy, which you can also use undiluted with a cotton cloth on the tip of your finger to clean the keys and outside surfaces of the melodica. A leak is most likely to involve the gasket inside the reed cover. Its source might be visible, an irregularity or deterioration in the gasket.
 July 20, 2018 at 12:58 am #10064André Sant’AnnaParticipant
Hello Alan, thanks for the reply!
The first time I tried, I removed the four screws, but the blue reed chamber cover did not come out, it looked stuck and I did not want to force it. Maybe it’s the spring clips, I’ll try to find them.
July 20, 2018 at 12:14 pm #10065Alan BrintonParticipantMAJOR CORRECTION: I should have said Vinegar (white distilled) and water for the bath, NOT alcohol and water. Very sorry. I’m not sure what I was thinking. Alcohol for cleaning the keyboard, etc.
I do not have photos of disassembly of my Pianica 32A, but the blue reed chamber cover is the same in the original smaller key Pianica 32, and there are detailed photos of its disassembly on the first page of a thread devoted to it:
There are no clips. The blue cover has to be pried off if it cannot be pulled off; pry as gently as possible, using a knife blade or small flat screwdriver wedged under the edge. You can see in this photo that the white gasket material is laid down in white strips. It’s a harder material than the removable rubber gaskets on later melodicas and might have to be replaced. If you search around here for “gasket” or “gasket material,” you’ll find a lot of discussion about replacing gaskets and suggested materials. In general, I suggest thin (1/16″ in this case) adhesive-backed stripping.
 July 20, 2018 at 12:18 pm #10066Alan BrintonParticipant
Not sure what happened with that photo:
July 20, 2018 at 4:49 pm #10068André Sant’AnnaParticipantNo problem, Alan. When I read, I thought about changing the alcohol for white vinegar. I’ve been able to disassemble the melodica, really it is like your example above. Apparently the gaskets need to be changed. I still have not started to remove the old ones, but one of my doubts is how to remove the glue that remains on the plastic or I can glue over the “old glue” if you understand what I mean ( I know a specific product for remove glue, but it has an extremely strong smell). Later I’ll try to post some pictures of the disassembled Pianica 32A. I’m sorry about English, I’m trying my best here from Brazil. Thank you very much for the help.
July 20, 2018 at 7:30 pm #10069Alan BrintonParticipantIt’s always a treat to hear from Brazil, Andre! There are probably some streaks of old glue in the gasket tray such as shown in that last photo. I don’t think there is any reason to remove them. The white gasket strips probably will break up somewhat and crumble when you start removing them. The residue should be able to be scraped off using edge of a knife blade. In my experience, that does not have to be done perfectly. Be sure there’s nothing loose remaining; wiping with alcohol will clean it well enough so that the adhesive backing of the new gasket strips will produce a seal.
I am very interested to hear how this works out for you. The Pianica 32A is one of the best vintage Yamaha or Tokai Gakki models (the earliest models were designed by Tokai Gakki and released under both names). It’s a good instrument.
July 23, 2018 at 5:06 am #10077André Sant’AnnaParticipantHello again, Alan. I disassembled and cleaned the entire melodica and after mounting it, the leak continued (not expected something very different, actually). It seems that I have to replace the gaskets and probably I will use a different material from that one that melodica originally has. I usually use an adhesive-backed stripping, just like as you suggested, but here in Brazil the thinnest has 2mm (1/13”, i think) which compared to the one that the melodica has, would be thick. I am afraid that if I use it, it may misalign the holes of the air chamber in relation to the key mechanism. Also I’m not sure if the current leak comes only from the air chamber, it might also come from the keys already. I also took the opportunity to align the reeds gap and, even with the leak, they are responding well. What a wonderful sound! I love that timbre! I hope I can solve this leak so that it works perfectly.
July 23, 2018 at 5:49 am #10078André Sant’AnnaParticipant July 23, 2018 at 2:06 pm #10079Alan BrintonParticipant
A leak could be coming from misalignment of one of the key pads with its hole or a problem with the pad material. If so, when you blow hard without depressing any keys, that note may sound.
I don’t think there would be any problem with the 2mm stripping, Andre. When I have replaced melodica gaskets, the new material is usually a bit thicker than what was originally there. And the stripping is usually easy to remove if you do it right away.
I am impressed with how thoroughly you have disassembled this Pianica. Did you keep track of the order of the keys, or were the keys of each type interchangeable? I always keep them in order, since on some melodicas there are problems if you don’t.
July 23, 2018 at 7:01 pm #10081André Sant’AnnaParticipantAll the white keys have a identification behind them, the name of the note ( c d e, etc) and a number that informs the octave. Some of them don’t, so i marked this ones (the c notes, for example, have the same identification, so I marked them). The black keys are interchangable. I didn’t notice any diference about their funcionality after assembled the Pianica. So I think everything is all right!
July 29, 2018 at 7:12 pm #10089André Sant’AnnaParticipantHello everyone.
Well, I tried to solve the leak problem of my Yamaha Pianica 32A. The leak was not much, but we always want our melodies working perfectly, don’t we?
So I decided to replace the original gaskets (which were not really in good condition) by adhesive-backed stripping with 2mm, which are thicker than the originals. Unfortunately, however, the leak got much worse with them. What could it be? The thickness? The different material of the gaskets? By the way, what would this material be? Attach pictures maybe you can help me. The first picture shows how it was originally. The second picture, how it is now. The third is an approximate photo of the gasket material.


 July 29, 2018 at 8:16 pm #10090Alan BrintonParticipant
It is hard to see the gasket strips in the second photo, Andre. I really doubt that the problem is either the difference in material or its thickness. How about where the strips meet?
Since replacing the gasket strips made the problem worse, it seems clear that this is where the leakage is coming from.
In the first photo, it looks like there are gaps at the corners where the strips meet. Usually pushing the material together at the corners is enough to provide a seal. But if not, then a little glue in those spaces might help. It seems silly to ask if the screws are all tight enough. But sometimes the thicker new material needs to be compressed by tightening a bit past the point at which the screws (or bolts) seem at first to be fully tightened, though we don’t want to overdo it
Also, the middle strip looks irregular. Is is lying flat and not rolled over anywhere?
Something else that is probably not a problem but than can cause leakage: Is there good spring tension on all keys? A weak spring can cause a loose fit of the key pad.
August 3, 2018 at 1:32 am #10116André Sant’AnnaParticipantYes, I observed the gaps between the strips and placed the strips as close as possible so that, when the air chamber is closed, the gaps disappear. When I blow, I realize that air comes out of the places highlighted in the picture below, but not the from the gaps where the strips meet. I initially thought they were from the key pads, but if they were, would not the sound of the reeds come out? I do not know if it would have any effect, but I pressed the key pads with my hand against the holes of the air chamber and the leak did not diminish at all. So, I do not think it’s the keypads either way.

About the strip in the middle, I believe it is unlikely that it is responsible for causing the leak because of its position. If you look closely at the first and second photos from my previous post, you may notice that with both the old gaskets and the current strips, marks have formed, which shows that they are fulfilling this role of “closing” the path (and letting some openings in the way for air to be directed to the reeds). I put a photo to show this “path” (I do not know how to nominate this).

The screws are tightened as far as possible. I suspect that they may not be enough to close the entire air chamber with a thicker strip because they are only four and have to deal with a relatively wide surface. I thought about trying to put a material more like the original or less thick. What do you think? Any indication?
Next picture, the strips more closely.

-
AuthorPosts
- You must be logged in to reply to this topic.