
Juliett Pianola Project
- This topic has 4 replies, 1 voice, and was last updated 7 years, 1 month ago by
Alan Brinton.
-
AuthorPosts
-
March 31, 2017 at 8:01 pm #8783
 Alan BrintonParticipant
I am in the initial phase of trying to refurbish my Pianola by Juliett, because I want it refurbished, but I also want to provide photos of what’s inside and to make a few comparisons with the Borel Clavietta. Here for starters is a photo of the banks of reeds of the Pianola (top) and Clavietta. The Clavietta’s reeds face up, while those of the Pianola face down, so that a direct comparison is not shown in this photo. My first impression was that the Pianola’s reeds were slightly longer, but in fact the reed plates and reeds of the two instruments appear on closer inspection to be identical. Consequently, it can be said with some confidence that the Clavietta and the Pianola have the same reeds. This is reflected in similarity in sound of the two instruments, as well as I am able to determine it working with two currently leaky instruments! My expectation at this stage is that the Pianola brings us a Clavietta-like sound, though at a somewhat higher volume. The Pianola does not share other unique design features of the Clavietta; although the Pianola’s (coated) metal body is distinctive and impressive in comparison with other vintage Italian melodicas (25-26 key — Chordiana, Sorrento, Pianetta, etc.), but its design is otherwise comparable to theirs.

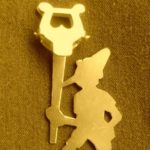
In the first of these next two photos, we have a peek at the ends of the other side of the Pianola’s reeds. Notice the small rounded brass buttons, the same as shown on the Clavietta in the second. There is this difference, though: starting at the A below Middle C, the Clavietta’s reeds are inverted, while all the Pianola’s reeds point in the same direction.


One other comparison: The Pianola’s keys are the same in width as the Clavietta’s, but approximately 1/2″ shorter (though about 1″ longer than those of the Chordiana and other small key melodicas).
March 31, 2017 at 8:22 pm #8784Alan BrintonParticipantHere now is the metal body of the Pianola, which has a tough plastic or hard rubber coating on the outside. Some of the coating hangs down into the ends of the inside of the Pianola body. The brown gasket strips shown in the first and third of the following photos appear to have been replaced and can probably be left in place. On the other hand, I think work needs to be done on the mouthpiece seals. The white material looks like a repair job. It’s not all air tight, and there’s a visible crack. Notice also the very visible mysterious cut-out at the other end. There may be some work to be done there as well.


 March 31, 2017 at 8:35 pm #8785Alan BrintonParticipant
Now we come to the main reed chamber gasket.


This green gasket has deteriorated and crumbled, and so I am in the process of scraping it off, after which I will replace it.
The same has occurred with the strips of padding that stop the white keys and black keys. The melodica is playable without these, but clacky. They will be easy to replace once the keys are removed. The keys are now removed. This is done by lifting off the ends of the springs with the dental instrument shown (courtesy of my friendly dental assistant). Once the spring is detached, the key lifts out. The individual key pads look fine.


There is also a lot of cleaning to do. The keys need cleaning. Debris is in the springs and all over the place. I will soak everything in a vinegar/water mix and clean with a toothbrush.
To be continued….
April 3, 2017 at 5:11 pm #8786Alan BrintonParticipantNext Stage – Thorough cleaning, removal of gasket and key stop strips.
The previous photo shows the reed chamber main gasket partially stripped and scraped off. These next three show show the same process for the key stop strips, which are made of similar material.


To some extent these strips can be peeled off, but they are glued in places and easily tear apart. It’s easier to finish the job after soaking for a couple of hours. During the soaking in roughly 1/3 vinegar, 2/3 water, and a squirt of dish soap, the keys are worked over with a toothbrush, and then the same with all external surfaces and nooks and crannies of the inner works of the Pianola. We have to be careful around the reeds.


I have learned from earlier projects that while the instrument is disassembled to this extent, it’s wise to clean everything thoroughly and do whatever else needs doing. Here now, is a comparison between cleaned and uncleaned keys. And then all keys cleaned and views of reed side and key side with remainders of stripping scraped off.


Next up: Replacement of main gasket and key stop strips, to be followed by full reassembly to be sure that further sealing work is necessary, which it almost surely will be.
April 5, 2017 at 9:09 pm #8793Alan BrintonParticipantReplacement of key stop strips, reassembly of keyboard:
I have decided to use Vacuum Gasket Tape For Clamping, 3/8″ x 1/8″, from Veneer Supplies, cut into narrower strips, to replace both the reed chamber main gasket and the key stop strips. It is easily applied. In this case, I used the short steel ruler to push the adhesive side evenly and securely into place.


Remounting of the keys involves positioning the key so that its pad meets its air hole and then reattaching the spring. The configuration of each key mechanism is fitted to its place on the keyboard. So keys should be kept in order. Reattaching the springs is a bit trickier with this melodica since it has relatively high spring tension (adjustable, but not in need of adjustment in this case).


The next two photos show a white key that is higher than the other white keys. It was one of two. I don’t Try to address this issue unless it is fairly significant, since it requires bending the key mechanism, which is easy but does involve some risk. With this instrument (and most Italian models), the metal arm on which the key pad is mounted has to be bent slightly inward toward the front of the key. It looks like it wouldn’t bend that way, but it does. Once the key is remounted, the front of the key will probably be too low, in which case it needs to be pulled up very slightly and gently, a small bit at a time, until the key top matches the others. The key mechanisms of other melodicas are different, but some such adjustment is often a way to even up the keys. While we’re at it, if spaces between keys are uneven, this can almost always be easily fix by depressing the closer adjacent key down and pushing the offending key slightly in the other direction.


And so here is our cleaned, newly cushioned and neatly remounted keyboard.

Next: Main reed chamber gasket replacement.
-
AuthorPosts
- You must be logged in to reply to this topic.